Once at Dana Point, PAE goes through the boat with a fine tooth comb and tests everything. Every switch, every light, every plug, every valve, etc. to be sure everything works. Through that process problems are found and fixed. In addition, a variety of work gets started with sub-contractors who's work is also part of the over-all purchase deal. One outfit will come on board and together we will sort out carpet, window shades, and any other fabric-like things. We also need to template and have custom mattresses made, install our life raft, mount the dinghy chocks, and a hand full of other things. Plus, the electronics firm needs to get on board to complete the electronics installation and configure and test everything.
Once all that's done we conduct a series of sea trials to really test everything out and shake out as many problems as possible. On anything as complex as a boat, there will be problems, and running the boat is the best way to find them.
Finally, after everything is tested and meets all the specs, we run off shore and take delivery in international waters. The commissioning process is supposed to take 6-8 weeks, but history suggests 8-12 is more realistic.
This past week's visit to the yard in Xiaman was my last opportunity to catch issues and get them fixed before the boat ships to California. Nearly everything is complete, so there is very little that can't be inspected. All the interior was complete in the last update, so this one will focus on the additional systems etc. that have subsequently been completed. The good news is that each time I walked through the boat, my list of issues and questions got shorter, not longer.
From a distance, you can see that the railings are all up, and now they are fully welded and polished. More electronics are up on the masts, and the fairing has been completed around the thruster tunnel. Now let's move in for a closer look.
 |
| Looking much less bare-bones |
Here's a closer look at the thruster tunnel. It's all blended in now and gel-coated over. The gel coat just needs to be wet sanded and polished to blend in, but it's not a big deal since all this will be covered with antifouling paint.
 |
| Thruster tunnel filled and faired |
A while back my friend John had asked about the way the stabilizers stand off the hull. The stabilizer backing plate is flat, and the hull rounded, so the edges stand off a bit (about an inch). Here it is smoothed and gel coated.
 |
| Stabilizer Actuator |
The main prop is installed. It's 5 blades and 42" in diameter. The hole in the rudder allows for removal of the drive shaft without removing the rudder. You just crank the rudder hard over and the shaft slides out through the hole.
 |
| 5-blade prop installed |
The wing engine, or get-home engine, uses a folding prop normally used on sail boats. When not in use, if folds up as you see in the picture posing very little drag on the boat. But when you engage the drive, the 3 blades fold out to create a 24" prop. In reverse it folds in the other direction so you have effective thrust in both directions. It's really a very clever design. The dripless shaft seal has also been installed where previously we had a big hole in the boat where the shaft passed through.
 |
| Wing engine folding prop |
The cockpit, though still a major construction zone, has come together too. The cap rail is all installed as are the final railings including going up the stairs. You can also catch a glimpse on the far left of the table for the settee.
 |
| Cockpit railings complete |
Here's a better picture of the settee and table.
 |
| Cockpit settee and table |
Looking forward from the Portuguese bridge, you can see all the lockers are finished along with all the forward railings
 | |
| Forward deck and bridge |
Down in the chain locker everything is now gel coated and filled with 400' of 1/2" chain.
 |
| Chain locker |
Last visit there were cutouts for the fly bridge controls, but no controls installed. And worse yet, it looked like the cutouts might have been wrong. But they weren't, and now we even have controls to fill the holes.
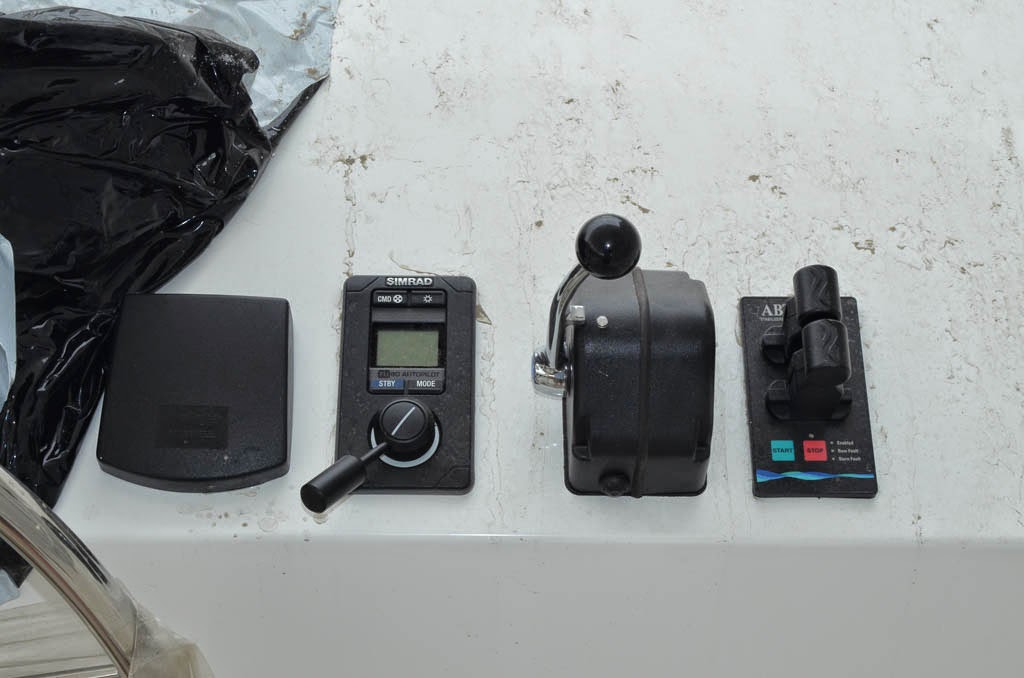 |
| Fly bridge controls |
Moving inside, all the heater units are now plumbed and wired. Before they were mostly in place, but nothing was hooked up. So far all of them look really good.
 |
| Heater unit plumbed and wired |
The lower dash panel controls are now installed in the pilot house too as you can see below. The arrangement is the same as the fly bridge to make things easier for my feeble mind.
 |
| Pilot house dash controls |
Next I climbed up on the fly bridge hardtop. Heights are not my thing, and even with a built-in ladder and grab rails, it was a bit unnerving. Once up there, you could see the two Simrad radar units, one a 6' 10kw pulse radar, and the other a 4G high frequency radar. Each have different strengths and weaknesses. One of each gives the best of both worlds, plus redundancy in case of failure.
 |
| 10kw, 6' pulse radar |
 |
| Simrad 4G radar |
At the very top of the mast is this tree arrangement to give the Sat compass, GPS, weather sensor, and anchor light unobstructed views.
 |
| "Tree" at top of mast |
There was a loose-end with the water maker installation the last time I visited. This raw water intake strainer also had a fresh water flush line attached at the top (small black hose) to flush the system. It turns out that the strainer assembly supplied by Spectra went missing somewhere along the line, so the yard fabricated this admirable substitute. But on closer inspection, the spectra-supplied assembly also includes a check valve so when you flush the system all the fresh water doesn't just flow out to sea. When the boat gets to CA, we will have to replace this with the proper assembly from Spectra.
 |
| Sea strainer for water maker |
Since my last visit the inverters arrived and have been installed along with an extra 100A battery charger. All the ships 120VAC service runs through the inverters. Having 2 inverters provides extra capacity when needed (up to 7kw), and some redundancy if one should fail. When running off the generator, both inverters plus the charger gang together to quickly charge the house batteries at a combined rate of up to 270A. When plugged into shore power we will charge more slowly using just the charger so we don't trip the shore breaker, but if plugged in overnight there is plenty of time so the slower charge rate is fine. And when we are someplace where the shore power is 50hz, the charger will still run fine while the inverters continue to provide 120V/60hz power on board. It's a pretty slick arrangement that should serve us all over the world.
 |
| Inverters and extra battery charger |
The auto pilot pumps are now completely plumbed into the steering system. If one pump fails, we can switch to the other and keep going. Having to keep 24x7 watches is hard enough. The loss of the auto pilot and having to manually steer would make things all the worse.
 |
| Auto pilot pumps all plumbed in |
Near the batteries is the battery switch and fuse panel. Nothing is labeled yet, but the switches control the 4 banks that make up the house batteries, along with the two starter banks. There are also controls for high-power loads like the davit and inverters.
 |
| Battery management switches and main fuses |
 |
| Steering gear all complete |
I think I mentioned earlier that the boat has been in the test tank for an initial run. We were not able to get a clear answer on what was tested and what remains to be tested, but we do know that the main engine, generator, and hydraulics were tested. The guy cleaning up hydraulic oil in the engine room was as indication of both the testing, and the initial results :-). But that's how you find and fix problems.
Another indication of the test tank are the load markings on all four "corners" of the boat, and the scum line on the hull showing where the water was. These marking will enable them to trim the boat before it departs Xiamen. The results of their first test show the aft starboard corner sitting a few inches too high.
 |
| Load line from test tank |
Here's one of the guys up on the hardtop finishing up the installation of the electronics.
 |
| Finishing up the mast electronics |
Dinghy and davit positioning is different on every boat, and we are no exception. We elected to "park" the davit facing aft when not in use. Most boats park it facing forward and it seriously blocks access to the boat deck. Parking aft opens up a lot of space, but it also requires some modification to the stair railing to clear the davit.
In the first picture it is facing directly aft. There is a removable railing section right where the davit points which can be removed and "parked" elsewhere, or the railing can be left in place and the davit raised slightly. The picture after shows it canted slightly to port. When over to port a bit, the Davit completely clears the railing and can be left fully down with the railings in place. Other than the esthetics of not having the davit point directly aft, this is the preferred position.
 |
| Davit parked facing aft |
 |
| Davit parked a little bit to port |
 |
| Chain stopper installed |
The boat has been built with three wing stations. These are small control stations in locations that are particularly useful for docking. Two on the Portuguese bridge, one on either side, with a clear view down the side of the boat for side docking. The third is in the cockpit for backing into a slip or for Med mooring. Adding them as part of new construction was cheaper than a single remote control system, and much more reliable.
 |
| One of the wing stations |
Nordhavn's naming scheme is suggestive of a boat's length, but it's only a rough indication. Our "60", for example, measures in at just below 65', and is exactly the same length (because it's the same mold) as the 63.
 |
| It's called a "60" even though it's just under 65' |
Another item that was completed while I was there is the final installation of the stairs leading up to the fly bridge.
 |
| Steps to fly bridge installed |
Down in the engine room things are are filling up, but it all remains neat and organized.
 |
| Engine room filling up, but still looking organized |
Here's a view from the aft quarter. They are tall boats in the water, and ridiculously tall when out.
 |
| A view from behind |
The cook top gets a stainless steel cage around it to keep pots and pans from sliding off in rough water. Having a pot of boiling water knocked over on you in rough weather would be a real problem, hence this gadget. It also includes special tongs that grab around a pot and then clamp to the cage to hold it in place. In this picture we were test fitting it to be sure the controls were still accessible
 |
| Cage around cook top |
Right now the biggest missing item is the exhaust system for the wing engine, which in turn prevents testing the wing. The muffler is custom made to fit the boat and has been back ordered, but should make it to the yard by the end of next week. Everything else is small and manageable, but I'll be tracking the wing exhaust very closely to be sure we get the boat on a ship to the US by the end of May.
Until then.....