Tuesday, February 27, 2018

Water Maker Media Filter

I have had two water makers, one operated primarily in New England waters, and  one operated primarily in the Pacific Northwest.  Both areas have very nutrient-rich waters, and this tends to plug up the water filters on a water maker.

The sea water has to be carefully filtered before being run through the reverse osmosis membrane at very high pressure (around 800 psi).  This typically happens in three stages, each with progressively finer filtration.
  • The first stage is a simple sea strainer to keep out large debris, jelly fish, etc. 
  • The second stage is a standard 2.5" x 10" cartridge filter using a 20 micro fabric filter element.  
  • The third and final stage is a similar cartridge filter, but with a 5 micron element
I was typically only able to get 8-12hrs of run time before needing to change the filters.  The filters can be cleaned and reused a few times, but we were always changing filters, cleaning filters, and buying more new ones.  The good news is that the filters were doing their job, but all the filter maintenance sure was a deterrent to making water.
Standard 2.5" x 10" 20 and 5 micro filters
On our last boat I replaced the standard 2.5" x 10" filters with larger 4" x 10" versions.  These worked much better because the larger filter elements can hold more material before plugging up, but were still not what he hoped for.

Talking to people and doing some research suggested two additional things we could do.  The first is a plankton filter which is like the standard cartridge filters, but uses a fine mesh stainless steel basket.  What's plugging up the filters is microbial life in the sea water, and the plankton filters do a much better job of catching it.  And the stainless basket can be rinsed clean and doesn't need replacement.  That sounded like a big improvement, but it still sounded like I was going to be opening sea strainers and cleaning them all the time which is not something I was looking forward to.

The other alternative sounded even better, and involved adding a media filter.  A media filter is a very simple filter that runs the water through some sort of "media" like sand or gravel.  Whatever is in the water gets trapped in the sand, and clean water comes out the other side.  This is exactly the principal that makes ground water safe to drink when surface water is not.  The ground water starts out on the surface, but gets filtered as it soaks through the ground.  Media filters are used for pool filtration, and a wide range of drinking water filtration.  They work equally well for filtering sea water for a water maker.

One of the best parts about a media filter is the way you clean it.  All you need to do is back flush it, which is simply running water through it in the reverse direction, and dumping the outflow overboard.   The reverse flow dislodges all the trapped crud and flushed it away.  There are no filters to open, baskets to clean, and no sea water getting splashed around inside the boat.  It's just a matter of switching a valve and running the flush pump.  Not THAT sounded appealing, so this is the direction I went.

At the Seattle Boat show I came across a vendor who had just the sort of filter I was looking on display, so I arranged to buy it from him at the end of the show at a discounted price, with "some assembly required".

Media Filter

With filter in hand, the next question was what to use for filter media.  Everyone I talked to said to use "pool filter sand", whatever that is.  I couldn't find anything that actually described how fine the sand should be, or what size material it would filter out.  As best I could tell, I should expect to filter out particles anywhere from 20-100 micron in size.  I honestly didn't know how much that would help the 20 micro filters already in place, but figured it could only help.  I called around and found a pool supply shop that despite it being February, was open and could sell me "pool filter sand", whatever that is.

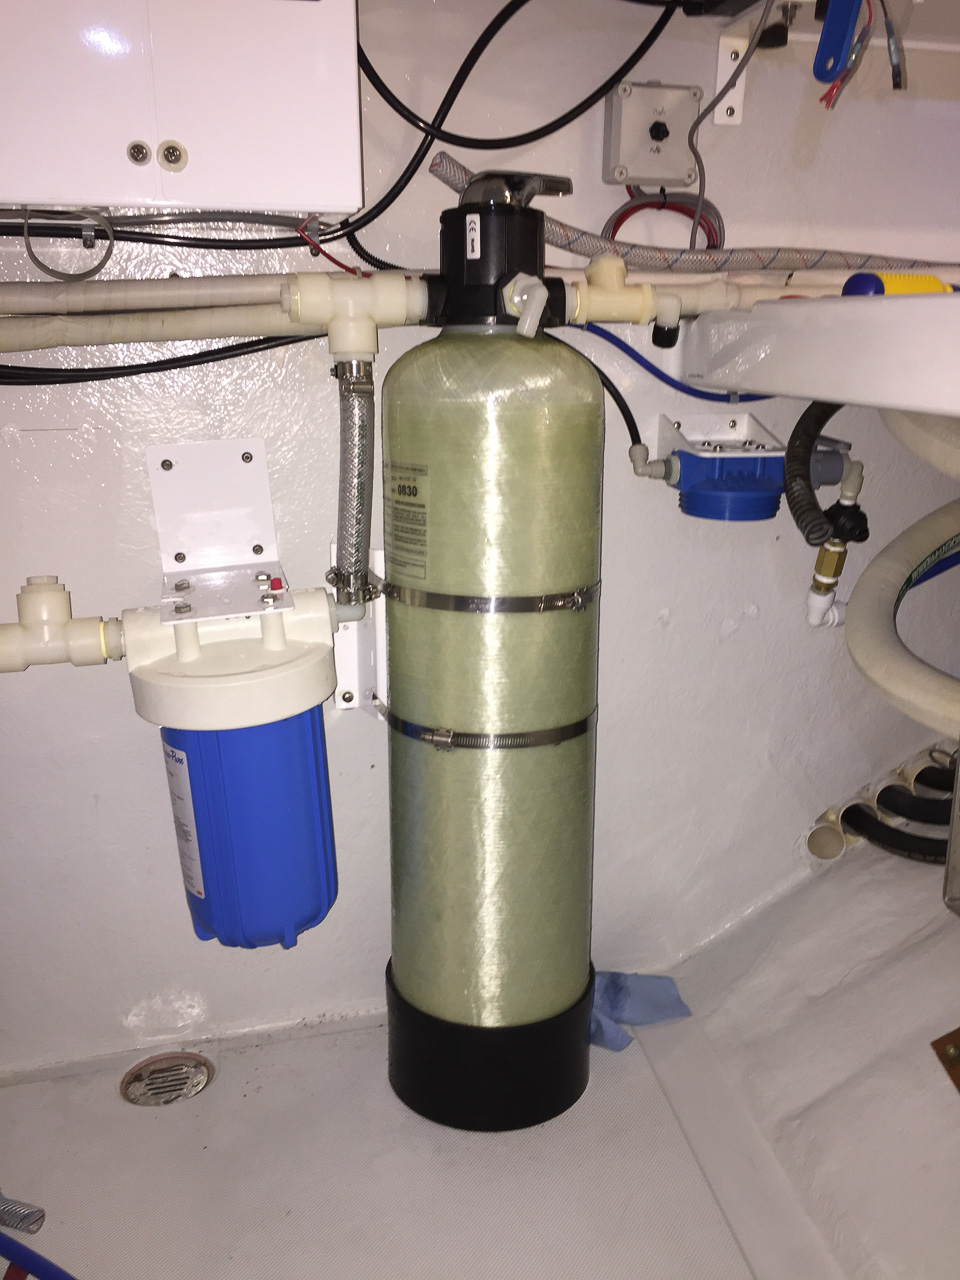
The media filter is an 8”x30” fiberglass filter cylinder with control valve.  The valve has 3 plumbing ports; one for incoming sea water, one for waste discharge, and one for filtered water outlet.  The valve also has three control positions:

  1. Forward Filter:  This is the normal operation position.  Water enters the inlet, flows through the filter media, then out the outlet to the rest of the water maker.   As material is filtered out and collects in the media, there is an increasing pressure drop across the filter, and eventually it needs to be cleaned with a back flush.
  2. Back Flush:  In this position, water enters the inlet, but flows through the media in the reverse direction such that is dislodges the trapped material.  And the outflow is directed out the waste outlet and overboard.   All you need to do is run the filter in back flush for 15-30 minutes, and it cleans itself.  That's my kind of maintenance.
  3. Forward Flush:  When you are back flushing, you do so with sea water.  As sea water is flowing through and flushing our previously trapped material, that same seawater is being filtered by the media as it flows through in the reverse direction.  Much less material is captured because it only runs for maybe 30 minutes, but there is still some.  When you resume normal operation for forward water flow, you are now essentially back flushing what you trapped during the backwash.  Make sense?  This is what Forward Flush is for.  It runs water through in the normal forward direction, but direct the outflow out the waste port and overboard.  So after a back flush, you do about 1 minute forward flush to clear out anything trapped during the back flush and get a clear forward flow.


Media Filter with Top-mounted Control Valve
In my quest for better filtering for the water maker, I was of a mind to hit things with the largest hammer I could find.  That was part of the thinking behind using a media filter rather than a plankton filter, and it also drove me to replace the 2.5" cartridge filters with the larger 4" x 10" cartridges.  I also wanted to relocate them below the water maker control unit to keep salt water away from it.  So I got two filter canisters and mounted them up in their new location where they had nothing but the floor drain to drip on.

New, Larger Cartridge Filters

And remember that large hammer that I've been swinging around?  Well, another frustration throughout my water maker ownership had been figuring out which filter or filters are plugged and which are not.  It's always been a guessing game, and has made if very difficult to figure out how to fix the filtration problems.

The solution was to add pressure sensors between each filtration stage so I could see exactly what the pressure drop is across each filter, and hence which filters were plugging up and which were fine.  I did this using our existing Maretron monitoring system, and pressure transducers.

Pressure Transducers

Getting back to back flushing.... to get a good back flush, there needs to be enough water flow to agitate the media to shake loose all the trapped material.  With too little flow, the media doesn't really get cleaned.  From the reading I could find, a back flush rate of 3-5 times the forward filtering rate is what was required, and I honestly didn't know if the pump that came with the water maker could adequately back flush, but figured I'd give it a try and see.

I ran for a year with this new setup, and wow, what a difference. The original 2” filters were only good for about 8hr of run time before cleaning was required. With the media filter and the big blue filters, I only changed the fabric filters as part of annually scheduled maintenance.   They never plugged up.  I back flush the media filter about every 8hrs of run time, and it’s really easy to do.  Just move the filter control valve to back flush, and turn on the pump.  I installed an “Auto/Manual On” switch for the boost pump that gets switched to “Manual On” to run the pump for back flush, and is left in Auto for normal operation.  I typically back flush for 15-30 minutes. You can hold a light up to the back side of the media filter and see the cloud of crud when you start the back flush, and see it clear over time.

This all worked very well, however by the end of the season I was having more and more trouble back flushing, so went back to the drawing board researching filter media and back flush flow rates.  The good news is that with the pressure gauges, I could tell that the problem was the media filter and not the fabric filters.  I was catching all the microbial material, but wasn't getting rid of it.

In my research I found a filter material called Micro-Z that is now part of Parker's product line. The material provides filtering down to 5 microns, and is much easier to back flush requiring only 1x the forward flow. So I gave it a try, and that was the key to success. I’ve been running for 3 years now with the stuff, and it still filters and back flushes great with the Spectra boost pumps.


Schematic of final system


Another challenge is fresh water flush. After running a water maker, you flush it with fresh water.  With the media filter, plus the big blue filters, there is a much larger volume to flush.  The flush water is first run through a charcoal filter to remove any chlorine which will otherwise ruin the water maker.  For proper filtering, run can only run water through this filter at a limited rate, and that constrains how fast you can flush the water maker.  What I discovered that there is a limit to the flush time in the Spectra controller, and it is actually too short. Even at max flush time, I was still getting salt content readings that were too high. So instead I set the flush time to 1/2 what’s needed, and after the automatic flush at the end of making water, I just manually trigger a second flush to finish the job.  It's not ideal, but works.

I would love to get Spectra to increase the allowed flush timer, and their new controller system may be able to do it.  I'm waiting for confirmation as I write this.

Saturday, February 24, 2018

Into Prince William Sound


June 13, 2017

After giving up on getting our packages, we decided it was high time to move on to Prince William Sound.  After all, that’s what we came to do.  So on the morning of the 13th, off we went to Fox Farm Bay on Erlington, Island, just at the entrance to PWS when approaching from the west.  We had a nice overnight, then continued on to Squire Island, now well inside the western part of the sound.  Then next to Mallard Bay on Knight Island, followed by Herring Bay, again on Knight Island.  Then to West Twin Bay on Perry Island, then to Bettles Bay, back on the Kenai Peninsula side.  All this to be staged for a run up Harriman Fiord, and College Fiord to see the College Glaciers.


Harriman came first, and what a trip.  There are actually eight different Glaciers that flow into Harriman Fiord.  We were able to get by all of them, and ended up at the biggest, the Harriman Glacier which is still tidal and actively calving.  After poking around for a while, we found a spot that was deep anchoring, but seemed acceptable so decided to stay the night in front of the Glacier.  Throughout the night you could hear rumbles of thunder that was actually ice calving off the glacier.  The next day we did some kayaking around the glacier, and decided to stay another night.


Then we caught a glimpse of an unexpected sight – people walking on the shore.  Where the heck did they come from?  We paddled closer, which took a while, and realized they were in kayaks.  Then we remembered that we weren’t that far from Whittier, and that in fact our own daughter had done a sea kayaking trip out of Whittier some number of years earlier.  We had a quick visit, and off they went.  Over the next several days we saw a number of other kayak groups poking around various areas.

After Harriman, we moved to Hobo Bay which is a little closer to College Fiord, then Bettles Bay, then made a day trip up College Fiord and back to Hobo.  College Fiord has nine Glaciers named after Harvard, Yale, and the “Seven Sisters”.  It's pretty ironic to view these colleges in their historic context as strictly men's and women's institutions, depicted in front of us as ancient glaciers.

College Fiord with Harvard Glacier in the distance.


Holyoke Glacier


Vassar Glacier


Here are Vassar, Bryn Mawr, and Smith leading up to Harvard.


Here’s a close up of the Harvard Glacier.  Those are 12,000’ and 13,000’ peaks in the background.


And then, as we get closer, we can’t get any closer.  Lots  of ice.


The Yale inlet forks off and leads to  - you guessed it – the Yale Glacier.  Here we are heading up the inlet.  This picture was "Miss January" for the Nordhavn 2018 calendar.


Yale Glacier


Then we moved in as close as we could to the Harvard Glacier until once again blocked by ice.


Next stop, Siwash Bay on Unakwik Inlet.  The next day we ran up to the head of the Unakwik Inlet to the face of the Meares Glacier, with plenty of big chunks of ice along the way.


After Unakwik, we started towards the Columbia Bay and the Columbia Glacier.  We were warned that getting close to the Columbia was unlikely because of the large quantities of ice coming down the inlet, and as we got closer, sure enough, the ice got bigger and more frequent.
 
First stop was Eickelberg Bay as a staging location, then the next morning we headed up Columbia Bay.  But we didn’t get vary far.  There is a bar a few miles up the inlet and huge amounts of ice ground on it making somewhat of a wall.  And even if you can get through it, there is risk of it closing up so you can’t get back out again.  So we poked around the bar for a while, then moved on.


After the Columbia Inlet, we started working our way east and south towards the Hinchinbrook Entrance to stage for our crossing back to SE Alaska.  We crossed the Valdez Channel and rounded the famous Bligh Reef where the Exxon Valdez ran aground and dumped millions of gallons of crude oil into Prince William Sound.  From there we tucked into Landlocked Bay and hung out for two days waiting for weather, then relocated to Garden Cove in Port Etches just inside the entrance, ready to depart the next AM to cross back to SE AK.

July 2, 2017 we departed through the Hinchinbrook Entrance and ran direct back to Sitka, docked at 12:00 on July 4th, just in time for the parade!

Rose Point Navigation's Nemo Interface

I've been using Rose point Navigation's Nemo interface for 2 years now, initially as an Alpha/Beta test customer, then as a full paying customer.  And I continue to test new releases since I seem to have special skills when it comes to breaking things...


- Nemo is essentially the interface to all your marine electronics. It connects to your marine electronics using the two standard interfaces (NMEA 2000 and NMEA 0183), and connect to your computer via ethernet.


- Because it connects to your computer via ethernet and not USB or serial ports, it actually works reliably. No drivers are required, which is the source of most evil in Windows.

- The NMEA 0183 interfaces are correct RS-422 interfaces, not RS232 which so many people use. The two are NOT the same, and are NOT compatible by design and by specification. Using RS232 to interface to marine electronics is just asking for a flaky, unreliable system.

- It supports four 0183 inputs, so you can bring in data from a number of sensors without requiring external multiplexers. This reduces complexity, reduces the number of failure points, and reduces cost.

- It supports two 0183 outputs. This lets you directly control an autopilot via 0183, and other devices as well.

- In addition to interfacing all your data to Coastal Explorer, Nemo also sends the data on ethernet using a de-facto UDP standard. Other devices on your network can pick up and use this data, like iPad apps, Coastal Explorer running on a laptop, etc.

- It has excellent NMEA 2000 support including superior source data selection. With N2K, all data from all sensors is on the network at the same time. As a result, it's up to each listening device to decide which sensors it wants to use. This is referred to as Source Selection, and some vendors do it a lot better than others. The simplest devices will automatically pick one of each sensor type, and typically they will fail over to another if the first fails. But you have no control over which it picks.

Better devices present you with a list of available devices and let you pick which you want to use. At least this lets you ensure the system is using the best of each device type that you might have. If the selected sensor fails, some will automatically switch to something else, where others require you  make a new choice.

The best devices present you with a list of available sensors and let you prioritize their use, picking which you want to be primary, which is secondary, and so fourth. Coastal Explorer and Nemo do this better than anyone else, allowing you to prioritize any arbitrary number of devices. The only other product I've encountered that comes close it the Furuno NavPilot which let's you prioritize up to three devices for each data type.

- Nemo passes "native" N2K data back and fourth between Coastal Explorer and the N2K network. This means that the actual N2K messages pass through to Coastal Explorer and it processes and interprets them. And Coastal Explorer sends N2K messages which nemo relays to the N2K network. LOTS of other N2K interfaces don't do this, but rather translate between N2K and 0183, communicating with the computer only via 0183. Translation between the two is NOT 1 for 1, and can sometimes be quite messy. Plus you lose all ability to do source selection for your N2K sensors. Nemo does this correctly.

- Nemo can also translate between its 0183 and N2K interfaces. This provides a bridging function between the two that otherwise requires dedicated converter devices. And it does this translation MUCH better than any other device that I've used, allowing you to select individual sentences/PGNs that you want translated, selecting the update frequency, and of course using proper source selection. I have not seen any other device that can do this.  With this translation function, I have eliminated four dedicated converters from my electronics suite.

- Nemo might seem expensive (list price $699), but when you look at what it replaces, it's a real bargain. First, if you are going to add proper RS-422 data interfaces to your PC, it's going to cost you.  Yes, you can get RS-232 USB adapters for about 5 cents each, but remember, they are not compatible with NMEA 0183, and although they will probably appear to work, it will be unreliable. I used one once in a pinch, and all seemed to work OK. But when I looked at the actual sentences being received by Coastal Explorer, a significant portion of them were corrupted. Enough made it through OK for things to mostly work, but do you really want corrupted data running around you navigation system? I sure don't.

Anyway, an ethernet-connected 4 port RS-422 interface can cost $300-$500. So right there is probably 60% of the cost.

Then an N2K interface will cost another $200 or so, and they are all USB connected. That means they only work with the computer they are plugged into, and you have the associated driver nightmares. Nemo gives you the same capability, plus more. The data is on the network, so any Coastal Explorer  (or other) systems can see it. And you are spared the windows driver fiasco. At this point you have pretty much covered the cost of Nemo.

Oh, and because Nemo puts the data on the network, it eliminates the need for one of the many devices that do that as a dedicated function. There's another couple hundred $$ saved.

Then, if you have any data translation conversion required between N2K and 0183, then you really start coming out ahead with Nemo. I have already replaced four $200 converters, and expect to replace two more. That's $800 worth of converters eliminated

- And in good Rose Point fashion, the product is reliable, simple to use, easy to update over the internet, etc.

When you consider what you get for the $$ you spend a dedicated chart plotter, or how much more software like MaxSea costs, and how it solves none of the data interfacing problems, I think Coastal Explorer + Nemo is a real bargain, and one of the best performing products I have used in a long time.

Adding 240V Inverter Service

As discussed in more depth in this article, we wanted to be able to do laundry while underway without running our generator.  Laundry can take hours, and it's not really enough load by itself for the generator.  To run it off the main engine alternator required two things; 1) 240V inverter power, and 2) more alternator capacity to handle the steady increased load.  The alternator update was covered in this article, and this current article covers the inverter service upgrade.

I went around and around in circles on how to add 240V inverter service.  As a retrofit, I had to work within the context and constraints of the existing boat, creating the following considerations:
  • Any new equipment needs to fit somewhere, preferably with minimal relocation of existing equipment.
  • Minimize long, fat wire pulls.  This means any large DC cables need to be confined to the laz near the batteries.  And wire runs from the laz to the main AC breaker and distribution panel in the pilot house should be kept to a minimum.  It's a long, circuitous route with very little extra space for fat cables.
  • There should be minimal (preferably none) increase in idle background power loads.  There is a certain amount of wasted power in an inverter, and I wanted to keep that to a minimum.  Also, transformers consume power and I wanted to keep that to a minimum.  These losses are inevitable to some extent when actually powering a device, but when the device is turned off, I ideally wanted all those losses to stop completely.
  • Our existing 120V inverter system is capable of 7kw, so if there is a way to leverage that equipment, it would help solve a number of problems.
  • If new inverters were required, it was desirable to have them be the same make/model as our existing inverters.  This makes sparing easier, and utilizes the existing control panels.
  • The amount of rework of our breaker panel should be minimized.  We had a single 240V service to begin with, and the idea was to split it into two separate circuits, one powered only from shore power or generator, and the other powered by 240V inverter service.  Also part of this was dealing with the circuits that are 120/240 split phase, vs those that are pure 240V.
Like I said this sent me around in circles for a while considering different alternative.  Here are some of them:
  1. Add a separate, dedicated inverter for 240V service.  I could leave the existing 120V inverter service unchanged which was good.  It would also be an inverter that I could completely turn off when not used, so no background power drain.  But I would have to find space for the new inverter, necessitating fabrication of some sort of power panel in the laz.  Large DC cables would have to be run with fuses and disconnects.  And two 10/4 cables would have to be pulled from the laz to the pilot house (one for shore/gen input power, and one for output power), plus probably a control panel cable.
  2. Reconfigure my 120V inverters for 120/240 service.  This initially seemed very attractive.  I could reuse the existing inverters so no new equipment would be needed, and no new large DC cables would be needed.  But it created complications elsewhere.  In their 120V configuration, one of the inverters goes into standby when power loads are low, thereby reducing the background power loss.  When configured for 240V service, both inverters would be on all the time, roughly doubling the background power loss.  Also, both the AC input and output cables would have to be replaced.  The existing input cable didn't have a neutral conductor, and the output only had one line conductor.  But the worst part was the subsequent need to rearrange the 120V power panel to balance it across two split phases.
  3. Add an auto-transformer to create 240V off the existing 120V inverter service.  This seemed promising.  There would be additional power loss in the transformer which I wasn't thrilled about, but it would be limited to the 240V loads.  And as long as it could be turned off with a breaker, the losses would not be there all the time.  There would be no need to rewire the 120V panel, and if I could fit the transformer behind the pilot house console, there would be no need to pull wires back to the laz.  The only hang up was figuring out how to have breaker space for a master-disconnect for the auto-transformer and 240V service.
I ended up going with approach #3, using a 6kw auto-transformer from Outback Power, the same people who make my inverters.

Here is a before of the 240V breaker panel.  You can see all the 240V devices as part of a single service.


And below you can see the after picture.  The only things on the 240V Ships service are the water heater, battery charger, dive compressor, and input power to the inverter.  To the right is the 240V Inverter service with main disconnect at the top, and the load breakers below.  The washer, dryer, and oven can now be run while underway, or while on 50hz shore power.


And here's a wiring diagram.


So far we are really happy with the results.  It's great to be able to do laundry while underway without the generator, and the loads are comfortably within the capacity of the main alternators.

Thursday, February 8, 2018

Receiving Packages While Underway


June 12, 2017 Receiving Packages – Not

One reason we wanted to spend some time in Seward was to receive some packages of parts and supplies.  This sounds like such a simple thing, but it can be one of the most complicated things when cruising.  Getting something shipped to you takes time, and to complicate further it can take a range of time, especially when shipping to a more out of the way place.  I remember one FexEx overnight shipment to the Bahamas that took a week, and that was only after tracking down the package ourselves and going to get it rather than wait for delivery.  And different carriers have different levels of performance in different areas.  So if you need to get a shipment and it will take 1 week to 10 days to ship, then you need to know where you are going to be 10 days ahead of time.  That’s something we seldom know when we are actively cruising, and even when we think we know, it often changes.  Then there is another challenge even once you know where to ship something.  Who do you ship it to?  In the bigger Alaskan towns where are shipping services that can receive and hold packaged.  Frontier Shipping in Ketchikan is a great example.  And sometimes marina offices will accept and hold packages, but we have found this to vary quite widely with maybe 50%-75% accepting packages, and 25%-50% not.  Seward is such a place, leaving only one choice – General Delivery through the Post Office.  Now that’s usually not a bad option since in Alaska the US Postal Service is typically the fastest and cheapest way to ship stuff, so that’s what we did.  As soon as we decided to divert to Seward, I placed a few orders for stuff, knowing that we would be around for a while, considering our side trip to Denali.

Here’s what happened.

First, as many of you probably know, you can’t pick a carrier for shipping via Amazon.  They do the picking.  Now you would think that when you order something with a shipping address of “General Delivery, Seward, AK”, Amazon’s computers would know that such a shipment must go via the USPS, not FexEx, and not UPS.  But no, they don’t know that, so shipped the package via UPS.  When it didn’t show up, I starting tracking and discovered this.  UPS said there was no such delivery address, and Amazon could only suggest that I go pick it up at UPS.  Well, that would have meant renting a car and driving about 5hrs round trip.  I don’t think so.  So I just let UPS give up and return the package back to Amazon where they credited my account.

Next, despite a discussion and confirmation via email and phone call about the package shipping via USPS, the next vendor still managed to ship to my billing address (home address) instead of the Seward post office.  So that product went to our house, and sat there for the next two months.  Brilliant.

Last was a package that was shipping from BC where of course there is no USPS.  So the very helpful company came up with a plan to ship via DHL to a dealer of theirs in Juneau, and that dealer would then reship to me via the USPS.  It sounded like a good plan, but the shipment was delayed, and DHL took longer than expected, and the package didn’t get to Juneau in time to reliably get forwarded to Seward before we planned to leave.  So rather than continue to wait around, we just had them send it to Sitka where the harbor office was happy to accept and hold packages, and we would get it on our return trip.  But now our return trip had to include a stop in Sitka, whether that made sense or not.

In all of this I think we did get one thing we ordered, but three didn’t make it.  Cruising isn’t always rainbows and unicorns.

Denali Side Trip


June 5, 2017 Mount Denali Side Trip

After nearly 2 months on the boat, we decided that a side trip would be a nice change of pace, so we rented a car and headed up to Denali National Park for a few days.  But this posed an interesting challenge.

The dock we were on didn’t have power for guests, so we were running our generator once a day, and otherwise operating like at anchor.  That’s no big deal, and something we do from time to time, but it assumes you are on board, able to monitor the batteries, and run the generator as needed.  Our trip would take us away for 4 days, and that’s too long for the batteries to last with the fridge and freezer running.

This left one option which was to leave the generator running the whole time we were away.  That’s normally something I wouldn’t do simply because if there is a failure of some sort, you want to be in a position to respond.  Another consideration is that you generally don’t want to run a generator for extended periods of time with a very light load, and that’s exactly what we would be doing.  After much head scratching, we decided to just go for it, fired up the generator, turned on the reverse cycle heat instead of the diesel heat to increase the load on the generator, and call it a day.  After all, commercial boats run generators 24x7, and we have a commercial generator.  If you walk the docks, more than a few boats have generators purring away all the time.

The drive up to Denali is interesting.  Heading to Anchorage, you parallel the Turnagain Arm which is a branch off the cook inlet that leads to Anchorage, and forms the upper boundary of the Kenai Peninsula.  The upper 25 miles or so of the Turnagain Inlet is a giant tidal flat that floods and runs dry with every tide change.  I don’t’ think I’ve ever seen a tide flood so far horizontally.

Denali is unlike other National Parks that we have been to because all of the access roads are quite a distance away from Denali itself, and there are very few places where you can even see the mountain.  The only road in is closed to general traffic and you need to ride a bus.  Along the way there are two vistas of the mountain, including at the end of the access road, but even then you are still over 20 miles away, and it’s a full day on the bus to get in and back.

Since we had a car, we decided to drive in as far as allowed on the access road, but to increase our chances of spotting wildlife, we decided to go really early.  Of course it’s pretty much always light, so we got up at 3:00 and headed out.  It paid off, and we enjoyed this encounter with a cow moose and twin calves.


The next day we decided to splurge and take a plane tour up into the mountains, including a landing on one of the glaciers in view of Denali.  The weather was crystal clear, and the views simply stunning.  I’ll let the pictures tell the rest of the story.


After a great visit ashore, we returned to the boat to a generator happily purring away, and no problems on board.

Crossing to Prince William Sound


May 31, 2017 Crossing the Gulf to Prince William Sound

After returning to Bartlett Cove, we realized that we had a good weather window over the next several days, and the we should get going across the Gulf of Alaska to Prince William Sound.  So we grabbed a cab into Gustavus for some provisioning, and departed the next morning.

The trip is about 350 miles to the Hinchinbrook Entrance, which is about a day and a half.  So an AM departure means arriving early evening the next day.  Along the way, there is really only one bailout point about half way in Yakutat, but our weather forecast looked good so it was a backup plan only.

On the way up during the first day, we passed Mt Fairweather which is over 15,000’ high, with the Grand Plateau Glacier dripping down to the sea in front of it.  The picture below is my attempt at adding scale to the whole scene.  The mountain peak is 15,000’.  The glacier begins at about 10,000’.  The primary flow starts around 6,000’ (note, this glacier is still over a mile above sea level), and the face at the sea extends up about 2000’.


Here we are at 23:15.  The sun is below the horizon, but it never fully gets dark, which makes overnight running really very pleasant.   


We had fantastic conditions for the run and as we approached the Hinchinbrook Entrance, we decided to just keep on going outside the sound and continue on straight to Seward.   That meant one more overnight, and by 13:30 on June 2nd we were tied up in Seward harbor.

Glacier Bay


May 19, 2017

Departing Pelican the next morning, we arrived at Bartlett Cove in the early afternoon and went ashore for the mandatory visitor orientation at the ranger station.

Visiting Glacier Bay during the main season requires a permit, and there is a limit to the number of boats allowed in the park at any one time.  Two big cruise ships are allowed, a couple of the smaller expedition cruise boats, and maybe 20 (I don’t recall the exact number) private boats.  That may seem like a lot of boats, but the bay is over 60 miles to it’s head, and has at least two major forks with dozens of other smaller forks.  Seeing only one or two other boats over the course of a day is typical.  There also are closures of certain areas at different times of year to prevent disturbing breeding sea mammals.

Getting a permit is first come first serve, and can be a challenge.  But, before June 1st, no permits are required and the park is open.  We decided to jump on this and spend about 10 days exploring.

Our timing at Bartlett cove couldn’t have been better.  Over the past years a new tribal center had been build, and the next day was a dedication ceremony and installation of two totems that had been carved for the center.  The tribe mostly reside in Hoonah now, and two boats came over with people in all sorts of ceremonial dress.  It was quite the event.

The next day we were off into the bay with an obligatory swing past Marble Island to see (and smell) the sea lions and the puffins, then off to South Sandy Cove to anchor.  But the protection wasn’t good, so we moved around to North Sandy Cove and found a much better spot for a blow of a night.

In our past visits much of the Muir Inlet has been closed, but not this time, so up we went.  We then ventured off into the Wachusett inlet and found a place to anchor up near the head.  Going up these glacial inlets is like watching time move backwards.  At the entrance, where the glacial face as been gone for decades, the shoreline is lush with vegetation and trees, all aged commensurate with the glacier’s departure.  Then as you go in further mile by mile, the trees get smaller and slowly disappear completely leaving only brush.  These areas have been free of the glacier for less time, and treed have just started to grow.  And as you approach the terminal moraine, it’s like a barren moonscape with little to no vegetation at all – just sand, gravel, and rocks.  At the head of the Wachusett Inlet is the Carroll Glacier, which has receded back miles from the water.

Carroll Glacier off in the distance


View up the Muir Inlet


Ice outflow from the McBride Glacier (not in view)


After Muir Inlet we headed back to North Sandy Cove for the night, then up to the Tarr Inlet the next day to anchor at Reid Inlet and the Reid Glacier.    Lots of wildlife was spotted along the way.


While anchored in Reid Inlet, I witnessed an eagle taking a duck.   It's first pass injured the duck so it couldn't fly.  Then on subsequent passes it tried to grab the duck, but it kept diving to keep free of the eagle.  Despite the ducks efforts, with it's injuries it was only a matter of time before the eagle won the battle.  Below is the eagle finally carrying away the duck.


Then up to Margerie Galcier to hang out until the first cruise ship got close, then down to Lamplugh Glacier where we found a small sea mount that you can drop an anchor on for a nice lunch break.  Most of the surrounding area is way too deep to anchor.  Then off the Blue Mouse Cove for the night.

Margerie Glacier

After Blue Mouse we headed back to Bartlett Cove, with another obligatory swing by Marble Island to see the sea lions strutting their stuff.