Wow, it's been 2 years since Tanglewood was unloaded in Everett, WA on Dec 23, 2020, and since we discovered extensive shipping damage. Spoiler alert - as predicted everything is now fixed, you can't tell anything happened to the boat, and all we have left is a good story. So here is the story of the repair, picking up after our last post which was about 1 month after repairs started.
All the damaged doors and drawers were taken to Brad's workshop where the face panels were peeled off with a planer, and new panel material was installed, preserving matched wood grain across adjacent surfaces. Here you can see three drawer faces with matching grain. I didn't count them, but I'd estimate there were 15-20 such panels.
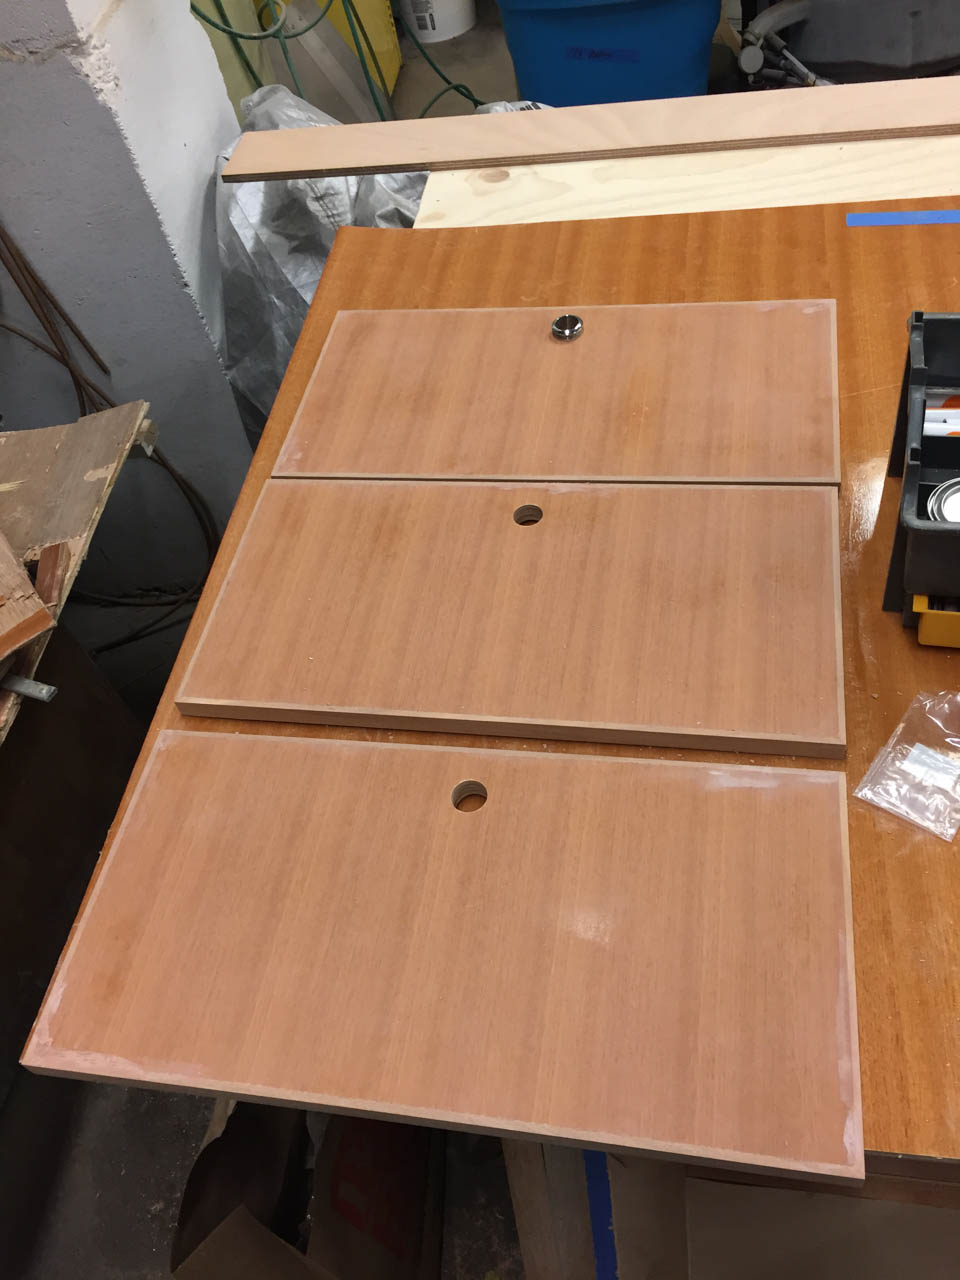 |
| Re-faced drawers |
Meanwhile, back on the boat the flooring was being removed, and the underlayment sanded and fared to accept the new flooring material. The gouging was deep enough in the original flooring that sanding would have left very little material behind. We also considered just laying new flooring over the original, but there are flush floor transitions from the cherry floor to granite that would have been lost, so the old material had to be removed.
 |
| Old flooring removed down to sub-floor |
Laying down the first strips were critical since everything else follows them. The center line was determined to bisect the opening where the floor flows from the salon to the galley, leaving even width remnants along both edges. The wood strips were flanked by wide aluminum flat bars to ensure an absolutely straight line. Note the lead ballast bars being put to good use.
 |
| First strips of new flooring installed |
Then installation continued expanding out on both sides, one batch at a time.
 |
| Building out flooring to port and starboard |
Progress continues working towards both sides of the room, working around various cabinets along the way.
 |
| Continuing build out around cabinets |
Then finally it's all sanded out, and will be covered over for protection while the rest of the cabinetry is completed. The very last step will be a finish sanding of the floor followed by a polyurethane finish.
 |
| Floor installed and sanded |
Rebuilt doors were eventually fitted and adjusted.
 |
| Fitting rebuilt doors |
And rebuilt walls were fitted and installed, and reattached to the cabinets behind.
 |
| Fitting new wall segment |
After lots of sanding, cleaning, and re-bagging for dust control, the finish is sprayed in multiple steps, ending in the final semi-glass finish.
 |
| Spray finishing cabinets |
The floor protection is then removed for final fittings, including final fitting of the soft patches in the floor.
 |
| Final fitting before floor finishing |
The floor finish is many coats of material to build up the finish for a perfectly smooth surface, then final coasts of semi gloss.
 |
| Building up and spray finishing floor |
And before you know it, the room is all fixed with no trace of damage, and no trace of repairs.
 |
| What damage? All fixed |
 |
| First signs of it looking like home. |
All this completed around June 1, 2021, so 5 months after discovery of the damage. I want to once again thank the amazing team of people who rose to the occasion to make this happen. It seems odd, but a couple of people have since commented that "those were good times", and in a perverse sort of way, they were. I met some great people, made some lasting friends, and together we pulled off a project that we are all very proud of.
Beautiful. I’m glad you’ve been able to recover from such a disappointing shipping accident. Looks great.
ReplyDeleteWe all know the factory has incredible woodworkers. Repairing at the same quality level is a testament to the dedication of Nordhavn to find the skill here. Well done PAE! Beautiful boat P & L! Roxia.
ReplyDeleteWhat's the cutout in the middle of the floor for?
ReplyDeleteThose are called "soft patches" and are removable sections of the floor that allow for removal and replacement of engines, generators, and other large equipment. Without them, you would be cutting large holes in the boat if any of that equipment ever needed to be replaced.
DeleteWhat type of finish is used on these floor and furniture panels? Is it regular polyurethane? Or some type of marine varnish? Nordhavn boats have such beautiful interiors. I was always curios how the finish is achieved?
ReplyDeleteIt's a two-part polyurethane, so essentially the same as car paint. It's very tough stuff.
DeleteThank you Peter. Is this the toxic type (iso) of finish that requires a positive pressure respirator with an air supply? Likely not achievable for an amateur then… I was hoping to finish my Ranger Tug interior in a fashion similar to the way your boat was done.
DeleteIt was done with tyvek suits and regular respirators, but I can see how in a production environment a positive pressure system would make sense. Don't ask how it's done Asia :-)
Delete